Whirlpool ‘Modular’ Crescent-Mold Icemaker
Whirlpool started manufacturing compact “modular” icemakers which is comprised of a single module that replaces ALL of the individual components in the control head (microswitches, motor, cam and mechanical linkages) of their older Crescent-Mold Icemaker design. This icemaker design may be found on any of their brand names’ products including Estate, Inglis, Kenmore, KitchenAid, Roper and Whirlpool as well as Maytag brands Admiral, Amana, Jenn-Air, Magic Chef, Norge as well as Sub Zero refrigerators. It is currently the most popular icemaker design in use.
Module Icemaker Confirmation
On very early production models the first clue indicating this icemaker design may be the little plastic knob on the side of the icemaker head to adjust water fill and as a result, the size of the cubes. Later production moved the fill adjustment screw to beneath the icemaker head cover.
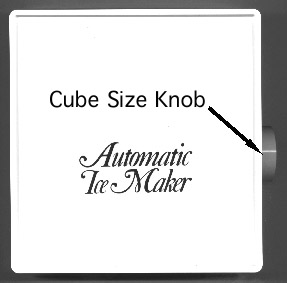
Pull the knob off (if present) and remove the front cover by rocking it and pulling forward. A brown plastic plate with a white label stating, “Disconnect Power to Remove Module” is your confirmation. A date can also be found on this same label that provides the module manufacture date. History
Whirlpool established a solid reputation for their compact crescent mold icemaker. The cost to manufacture this little jewel must have gotten too high because in the late 80’s Whirlpool management decided to redesign their flagship icemaker that was used in most of the refrigerators made at that time.
The Whirlpool engineers were asked to design an icemaker with components that could be assembled with robots and thus reduce production costs by eliminating labor costs. A single module now contains all of the functions of the discrete components in the old icemaker such as microswitches, thermostat, wires and motor. A couple of copper strips on the backside of the big white plastic gear control the timing for everything. See the photo below of the front of the module and the big white gear.
I bought a Sears/Whirlpool refrigerator that was manufactured in 1991 that had a modular icemaker manufactured in the same year. In 1996 the icemaker failed. The failed module number was 106.626632. Upon further examination, I noticed that the pawl had broken off the plastic linkage (see photo)

I purchased a new module that had a newer number, 106.626633, for around $70. This was only about $20 less than a whole new icemaker. I noticed a couple of changes in the new module – the plastic linkage was much more robust and the motor housing was smaller.

Less than 2 years later, the icemaker stopped working again. This time the motor failed. I purchased another module
When your icemaker malfunctions you have only two options – replace the module or replace the whole icemaker.
The Modular Icemaker Cycle
Harvesting of ice is initiated with the closing of the icemaker’s internal thermostat. The motor and heater are powered, the feeler arm raises and the ejector blades rotate until they come in contact with the ice at about the 4 o’clock position. The motor stalls there until the heater frees the ice from the mold.

Once the ice is dislodged from the mold, the ejector arm continues its sweep. At between the 7 and 8 o’clock positions the thermostat opens again. When the ejector blades reach the 10:30 position, the ice dumps into the bucket. At about the 11 o’clock position, the water valve is energized and the ice mold is filled again. As with Whirlpool’s compact crescent icemaker, the feeler arm will turn off the icemaker if it comes in contact with ice on its way back down.
Average Ice Production Time
Average ice production time is the approximate time needed for one complete cycle, from fill to one dump of ice. Complete cycle time for full-size, 8-cube icemaker models is usually between 1 hour, 45 minutes to 2 hours (or approximately 8 to 12 batches of ice in a 24 hour period) depending on the type and size of refrigerator it is installed in. Top-freezer refrigerators are usually toward the slow end of the scale.
Fill Time and Amount
The icemaker fills on strictly a time basis. It should fill for approximately 7.5 sec. resulting in 140cc (about 4.75 oz.) of water filling the ice cube mold. If needed the fill time (and thus fill amount) can be adjusted slightly. This however should rarely be needed after initial installation and connection. If the unit is filling more or less than it has in the past, there may be a problem which should be looked into.

If no knob is visible on the outside of the unit, there should be a fill adjustment screw under the cover on the edge of the control head. Turning the fill adjustment screw clockwise decreases the water fill time. One half turn equals 20cc or 1.2 sec., a full turn equals 40cc or 2.4 sec.
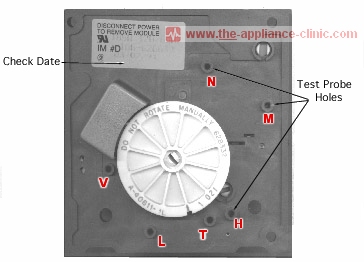
Test Points
There are several test points located under the front cover of the icemaker assembly. They can help to test the various components and functions of the icemaker unit.
- Testing for voltage between test points L and N should measure 120 volts if the icemaker is receiving power. Note: On some models power is disconnected from the icemaker whenever the door is opened.

All resistance checks must be done with power disconnected from the icemaker or whole appliance!
- Testing for resistance between test points L and H will check the icemaker’s mold heater (~72 ohms).
- Testing for resistance between L and M will check the motor resistance (~4400 – 8800 ohms).
- Testing for resistance between V and N will check the resistance of the external water valve solenoid coil (~300 ohms).
- Testing for resistance between T and H should show continuity (zero resistance) if the icemaker’s internal bimetal thermostat is closed. It will read infinite resistance if open. Testing for voltage should show 0 volts if the icemaker’s internal thermostat is closed, 120 volts if the thermostat is open… and the icemaker is getting power. Note: The internal icemaker thermostat will only be closed if the icemaker is and has been below 15°F for some time.
A 14 gauge insulated (except for 1/2″ on each end) preferably solid-wire can be used as a jumper to initiate functions of the icemaker unit.


Testing on a ‘live’ appliance can be dangerous! Anyone unfamiliar with proper safety precautions should not attempt it.
- Jumping between T and H on a powered icemaker will simulate the closing of the internal thermostat. It will initiate a harvest cycle, powering the icemaker motor and the mold heater. Remove the jumper after 3 seconds and icemaker should continue to run. Note: If the jumper is not removed before the ice ejector blades reach the 10:00 o’clock position, the water valve will not be energized and the icemaker will not fill.
- Jumping between M and N should power the icemaker motor.
- Jumping between L and V should energize the water valve.
- Jumping between H and N should energize the ice mold heater.
Replacing the Module
- The safest way to replace the module is to remove the whole icemaker from the freezer section.
- Loosen the two screws on top and remove the one screw on the bottom to free the icemaker.
- Unplug the icemaker and wash out any remaining ice in the mold.
- Pull the cube size knob off (if used) and then pull the front cover off the icemaker.
- Remove the three screws at the corners of the module and gently rock and pull the module forward until it is free.
- Slide the shaft for the ice mold fingers and the wire bail into their respective sockets at the rear of the replacement module while pushing the module into place from the front.
- Replace the three screws, the front cover and the cube size knob.
- Plug the icemaker in to its power socket and remount it on the side of the freezer section using the three screws.
- Give the icemaker a few hours to cool before verifying that it is making ice again.